To stop plosives without ruining your take, position your mic at an angle or slightly below your mouth to reduce airflow directly hitting the capsule. Use a pop filter placed 2-3 inches in front of the mic to block bursts of air from ‘p’ and ‘b’ sounds. Also, soften your lips or slightly change mouth position when whispering or pronouncing these sounds. Adjusting these techniques can make a big difference, and there’s more to explore for perfect vocal clarity.
Key Takeaways
- Position a pop filter 2-3 inches in front of the mic to block air bursts without affecting vocal tone.
- Slightly angle the microphone away from your mouth to reduce direct airflow hitting the capsule.
- Adjust your distance from the mic, sitting slightly farther to lessen plosive impact while maintaining clarity.
- Use real-time monitoring with headphones to detect plosives early and make quick positional or vocal adjustments.
- Practice softening or slightly changing mouth movements during plosive sounds to minimize explosive bursts naturally.
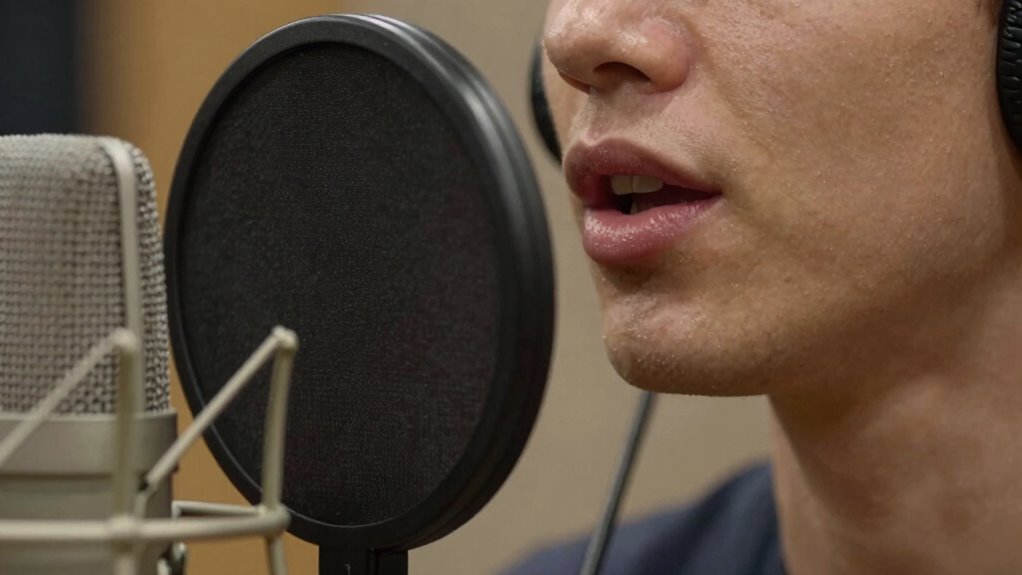
Plosives are those sharp, booming sounds that happen when you pronounce “p” and “b” sounds too close to the microphone, often ruining a vocal recording. They create a burst of air that hits the mic capsule directly, causing distortion and unwanted noise. To prevent this, you need to pay attention to your setup and technique. A pop filter is one of the most effective tools you can use. It acts as a barrier, dispersing the air from plosive sounds before it reaches the microphone. Positioning your pop filter correctly is essential—place it about 2 to 3 inches away from the microphone and directly in front of your mouth. This distance allows your voice to be captured clearly while still blocking those aggressive bursts of air.
Placing a pop filter 2-3 inches from the mic blocks harsh plosive bursts for clearer recordings.
In addition to using a pop filter, microphone placement plays a key role in minimizing plosives. You should avoid speaking directly into the microphone’s capsule, especially when hitting plosive sounds. Instead, angle the microphone slightly off to the side or below your mouth. By doing this, you reduce the direct airflow hitting the mic, which diminishes the likelihood of plosive distortion. Experiment with the distance between your mouth and the microphone; sitting too close increases the risk, while backing off slightly provides more control over explosive sounds.
Another technique involves controlling your vocal delivery. When you feel a plosive coming on, slightly change your mouth position or soften the “p” or “b” sound. This may feel unnatural at first, but with practice, you’ll develop a habit that prevents those explosive bursts from hitting the mic with full force. Combining this with proper mic placement and a pop filter creates a robust defense against plosives, ensuring cleaner recordings. Additionally, understanding the mechanics of sound waves can help you better control your vocal technique to reduce unwanted noise.
It’s also wise to monitor your recordings with headphones as you sing or speak. This way, you can catch plosives in real-time and adjust your distance or technique accordingly. If you notice a pop on a take, don’t be afraid to pause and reposition your microphone or adjust your vocal approach. These small adjustments can make a significant difference in the quality of your recordings without sacrificing your performance or having to redo entire takes.

Aokeo Professional Microphone Pop Filter Mask Shield For Blue Yeti and Any Other Microphone,Mic Dual Layered Wind Pop Screen With Flexible 360° Gooseneck Clip Stabilizing Arm
- Double Layered Pop Filter: Disperses air pressure for clear recordings
- Universal Compatibility: Fits various microphone stands and booms
- Flexible Gooseneck: Adjusts angle and position easily
As an affiliate, we earn on qualifying purchases.
As an affiliate, we earn on qualifying purchases.
Frequently Asked Questions
Can Plosive Reduction Techniques Affect Vocal Tone Quality?
Yes, plosive reduction techniques can affect your vocal warmth and recording clarity. When you use de-essers, pop filters, or adjust mic placement, you might unintentionally dull some warmth or make your voice sound less natural. However, if you’re careful, you can minimize plosives without sacrificing tone quality. Experiment with settings and positioning to maintain that clear, warm vocal presence while controlling those harsh plosive sounds.
Are There Specific Microphone Types Better at Preventing Plosives?
Think of your microphone as a gentle guardian, shielding your voice from harsh bursts. Cardioid and hypercardioid polar patterns excel at rejecting unwanted noise, including plosives, making them ideal choices. Additionally, microphones with built-in pop filters or those paired with foam or metal mesh pop filter materials provide extra protection. Choosing these types helps prevent plosives without compromising your vocal tone, keeping your recordings clear and natural.
How Do I Choose the Right Pop Filter for My Setup?
You should choose a pop filter made from durable materials like metal or foam, depending on your preference. Metal pop filters are sturdy and easy to clean, while foam ones are more affordable and effective at reducing plosives. Position the filter about 2-3 inches in front of your microphone, slightly off-center, to catch bursts before they hit the capsule. Adjust placement strategies based on your vocal style for ideal results.
Should I Adjust My Microphone Distance to Minimize Plosives?
Think of your microphone as a lighthouse guiding your voice safely through the storm. Adjust your vocal distance by moving slightly back, creating a buffer that softens plosive waves before they hit the mic. Proper microphone placement is key—stay about 6-12 inches away, and angle it slightly downward. This helps minimize plosives naturally, preserving your vocal clarity without sacrificing tone or energy.
What Post-Processing Tools Are Most Effective for Removing Residual Plosives?
To eliminate residual plosives, you should use de-essing plugins, which target harsh sibilance and plosive sounds effectively. Spectral repair tools are also valuable for more detailed edits, allowing you to isolate and attenuate problematic frequencies without damaging the vocal quality. Combine these tools carefully, listening closely to avoid over-processing. This approach ensures clean vocals while maintaining a natural sound, even after initial recording adjustments.

Desktop Microphone Stand Height and Angels Adjustable for Diameter Max 1.77" Desk Mic Stand Holder, Table Microphone Holder Hold Up to 3.3Lbs Suitable for Podiums, Meeting Rooms, etc
- Universal Compatibility: Fits most desktop microphones up to 1.77 inches
- Adjustable Height and Angle: Height from 3.15 to 11.02 inches, 360° swivel
- Stable Non-Slip Base: Weighted rubber base for secure placement
As an affiliate, we earn on qualifying purchases.
As an affiliate, we earn on qualifying purchases.
Conclusion
Now, as you listen back to your recording, you might notice how a simple change—like repositioning the mic or gently moving your head—can make all the difference. It’s almost like the universe conspired to help you capture a cleaner vocal take without sacrificing energy. With these tips, you’ll find that stopping plosives becomes second nature, turning what once felt like a hurdle into a seamless part of your creative process.

Shure SM58-LC Dynamic Vocal Microphone – Professional Handheld Cardioid XLR Mic for Singing, Live Performance, Studio Recording, Podcast & Broadcast, Black
- Legendary Vocal Clarity: Warm, articulate vocals with midrange lift
- Trusted Worldwide: Popular choice for live and studio use
- Precision Cardioid Pattern: Focuses on voice, reduces background noise
As an affiliate, we earn on qualifying purchases.
As an affiliate, we earn on qualifying purchases.
MENERESAS 3-in-1 Mini Microphone for iPhone: Wireless Lavalier Microphone with 80ft Range & 15H Battery – Noise Reduction Lapel Mic, Real-Time Monitoring for Video Recording Power Conditioners
- Extended Wireless Range: Up to 80 feet with stable 2.4GHz
- Long Battery Life: 15-hour receiver and 5-hour transmitter
- Easy Setup: Plug-and-play universal receiver
As an affiliate, we earn on qualifying purchases.
As an affiliate, we earn on qualifying purchases.